Let’s Dive Into DAWs: Are You Ready to Amp Up Your Recording Game?
If you’re curious about recording, and you’ve taken it upon yourself to do some inquisitive Google searching on the subject, you’ve probably come across the term “DAW” a number of times already. Maybe you’re asking the question that all of us have asked at one time or another - what is a DAW!?
The DAW acronym stands for “Digital Audio Workstation”. It’s a software that can record audio, has a user interface that allows you to manipulate the recorded audio, mix it all together, and create a track!
With so many DAWs on the market, it can be difficult to know which one is right for you. There are a plethora of options that offer many unique workflows, and I encourage you to do some digging on each one when making your decision. For the purposes of this short blog, I’ll quickly discuss three popular DAWs that are excellent, but are by no means the only “good” or “standard” options out there.
- If you’re a believer in the Apple ecosystem, then your devices are pre loaded with GarageBand. For free! I repeat, FOR FREE! GarageBand is a great way to get familiar with recording at a literally non-existent price-point. It may not have the surgical tool kit of it’s costly contemporaries, but don’t underestimate what you can do with a little practice using GarageBand.
- Apple presents Logic Pro as their graduation from GarageBand. If you’re comfortable on GarageBand, you can open your existing sessions in Logic Pro, and the user experience won’t be all that different. However, you will have an abundance of new tools and workflows available to you. Logic Pro is oft-used in the professional industry, and is a well loved tool for film scoring, home studio production, and running full band recording sessions.
- Pro Tools is a powerful DAW, and the “industry standard” for recording software. That’s not to say that Pro Tools is leagues ahead of other DAWs, but it was one of the first digital recording solutions on the market, and has since become a staple in commercial recording studios around the world. As your recording journey progresses, if you decide you want to make a go of a career in audio engineering, knowing your way around Pro Tools is a huge plus!
Now that you’ve explored some options, and you’re set to start recording, let’s discuss some great tips for all levels that should help you get started, and may even help solve some issues for experienced producers!
Gain staging - avoid clipping!
Clipping occurs when the level of an incoming signal is set too high (the gain is too hot!). It sounds like distortion - and not the good rock n’ roll kind. While some experienced producers might make like Icarus and fly too close to the sun with their signals, the general rule for the rest of us is to avoid clipping at all costs. So, how can you achieve this?
Gain staging. First off, before you hit the record button, you want to make sure your fader is showing plenty of headroom - is the signal coming in way above unity gain (0db)? Maybe dial back the gain on your interface. Here’s what a way too hot signal looks like:

What if it’s coming in around -7db? This is great, hit that record button!

As you build your recording, don’t be afraid to continue to drop all your faders to silence, and bring them up one by one, slowly. Remember, as you add instruments to your track, the main output channel (Stereo Out in the photo above) will get louder and louder, and you need to avoid clipping there. By re-adjusting (gain staging!) your faders every so often, you can avoid clipping all together.
Basic EQ
Any DAW will provide some tools for EQ. Today we’ll focus on parametric EQ. Here’s a picture of what Logic’s default parametric EQ plugin looks like:
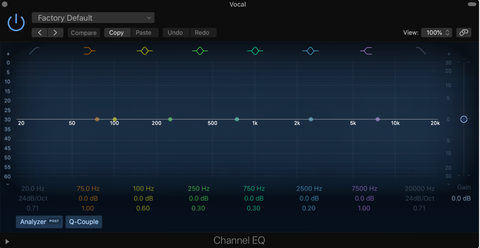
In any session, EQ is a basic and essential tool, and I want to outline two important use cases: low cut filters, and high cut filters. If you plan to record two or more instruments, you’ll need to “mix” them together. Let’s say you have a guitar track and a bass track, try this:
Guitar:
- Open your parametric EQ, and add a low cut filter:

- Then, look for the lowest notes the guitar plays in your song.
- Lastly, drag your low cut filter just below the guitar’s lowest note
What exactly does this accomplish!? Well, you’ve now cleaned up some of the “low rumble”, the “mud” in the mix. This is extremely important, because you’ve created some room for your bass guitar to occupy that frequency range. Your guitar and bass will sound more “balanced”, or “mixed”, and this will help your track sound so much better!
Maximize the potential of your surroundings
It’s always good to remember that all the magical tools available in your DAW can’t fix a bad recording! So take the time to turn off your AC unit, unplug the fridge (just for an hour or so!), and throw up some blankets to tame your room a little bit. In general (but certainly not in all cases), the more “dead” your room sounds, the better your recording will be. The trick is to start with the best recording possible in your space, and work with all the wonderful tools your DAW has to offer to enhance your already brilliant recording.
If you need a little extra help with some of these tips and tricks, here are some excellent resources:
- Check out this awesome Logic Pro X tutorial series from MusicTechHelpGuy
- Learn how to turn your bedroom into a studio with the folks at ADAM Audio
- Use this great video from B&H to dive deeper into using a parametric EQ!
---
Dan Rougeau is a multi-instrumentalist, songwriter, and performer based in Montreal. Check out what he does here.
Want to level-up your playing? Pre-order your Jamstack 2 amp today!